With switching off analog phone lines and going for all-IP, the importance of DSL connections has yet again risen. Especially for not so technical users (parents, grandparents) this meant dumping the old ever-working phone, signing a contract for internet access and bringing a DSL router home. Obviously most don’t understand the resulting constraints and risks. For this reason, and simply because it was on my list, I put together a DSL lab.
I also gave a talk on the topic during H2HC 2018 and TROOPERS 2019 in Heidelberg . The slide set can be downloaded here .
Setup
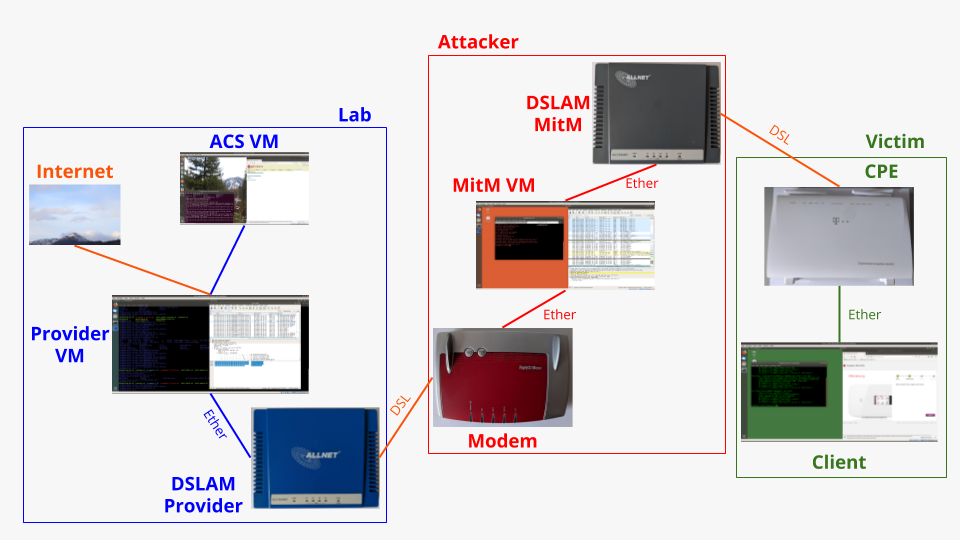
My overall lab is split into three parts. The Victim part consists of whatever router I’m currently assessing and a client connected to that router. While the client is not necessary it offers access to the router’s admin interface and is there for traffic generation. I also have a phone on the side, which I connect to the router for test calls etc. The Lab part is simply there to emulate an ISP’s network within my lab environment. I chose this setup as it allows me dry runs for MitM scripts / tools. Thus I can make sure they work properly (silently) before connecting them to a productive network. The Lab part is also used for offline research on routers. The Attacker part is what I use for practical rMitM and sniffing when playing with a router on the ISP’s actual access network.
All in all the overall setup consists of:
- Two DSLAMs
- A DSL Modem / Router in PPPoE pass through mode
- Three Ubuntu VMs
- A router / the victim
For routing / connectivity I use a USB hub and four USB NICs. This allows me to separate all connections and VLANs and terminate these only in the correct VMs. It does take up quite a bit of computing power, but makes work much easier.
Components & Tools
DSLAM
The DSLAM I use is an Allnet ALL126AM2. At some point in 2018 Allnet discontinued the device and launched the ALL126AM3, although I haven’t tested it, yet, it should also do the job! I’ve documented the DSLAM here .
PPPoE Server
To establish the initial communication / PPP channel, one needs a PPPoE Server. After a bit of searching, I found the rp-pppoe server. Whilst writing these lines, I saw that the project seemingly moved away from RoaringPenguin and can now be found here . I’ve documented my settings here .
ACS
I’m running a GenieACS server in my lab, which I documented here . It’s an open source ACS server, which runs stably from default config and comes with a webinterface and basic functionality.
Approaches
Sniffing
Integrated Packet Sniffers
Many modern DSL routers offer a sniffer functionality for the Uplink interface. Although the feature is often slightly hidden in a dark corner of the admin interface, it can be easily used to create a PCAP. Personally I prefer to use an external / independent solution for sniffing but it simply does the job.
External Modem
Some routers allow the use of an external modem, which is then connected to one of the ethernet ports. Using this approach, all uplink traffic leaves the router as plain ethernet and is thus accessible for us.
MitM
A MitM position can be achieved in two ways. The first approach is the one described above, the use of an external modem. As all communication between the router and the modem is plain ethernet and can modified using typical IP tools. The second approach, my preferred one, is the use of an DSLAM and a modem as shown in the overall lab overview. The DSLAM terminates the communication from the router, converts it back to ethernet and the modem eventually converts it back to DSL for the phone line. I stick to this approach as it is independent of the victim router. As such there are no changes which might influence results and it even works when the router is not accessible for some reason.
Victims
- Vodafone EasyBox 904 xDSL
- O2 Box 6431
- O2 Box 6641
- Telekom Speedport W921V
- Telekom Digitalisierungsbox Basic